Environment for Docker Swarm
Recently I’ve been dusting off my knowledge about basic use of Docker Swarm. To create a cluster I’ve decided to use Vagrant. It allowed me to create multiple machines quickly, along with all the SSH keys setup, management and so on.
The bit that was a bit more unusual was that those VMs were running inside… other VM (nested virtualization). It might be a little over the top - but when learning I really like this kind of setup. As I don’t work directly on my main system I don’t worry I screw something up - if I do I could simple delete the VM and recreate test environment. IMO it leads to much better training sessions as I’m not afraid to try even really dumb things :D .
Base VM preparation
For a base system I’ve picked Rocky Linux with Gnome desktop. It is not really important what kind of hypervisor you’ll use as long as it supports nested virtualization. In my case it was KVM (with Virt-Manager as a GUI). As setting up a VM is super easy process I won’t describe it here - in most cases you just need an install ISO and a couple of clicks in the interface. After that rest of the things were done inside it. When the base system has been installed I updated it and went through those steps:
- Checked whether nested virtualization actually works
https://docs.fedoraproject.org/en-US/quick-docs/using-nested-virtualization-in-kvm/
- I added virtualization tools
sudo dnf group install -y "virtualization hypervisor"
sudo dnf group install -y "virtualization tools"
sudo systemctl enable --now libvirtd
- I’ve started libvirt and added user to respective group
sudo systemctl enable libvirtd --now
sudo usermod -aG libvirt <USERNAME>
Docker install
- Added Docker repo
sudo dnf config-manager --add-repo https://download.docker.com/linux/rhel/docker-ce.repo
- Installed Docker
sudo dnf install docker-ce docker-ce-cli containerd.io docker-buildx-plugin docker-compose-plugin
- Started service
sudo dnf install docker-ce docker-ce-cli containerd.io docker-buildx-plugin docker-compose-plugin
- Added user to docker group
usermod -aG docker <USERNAME>
Vagrant as a tool for starting up nodes
- Added Vagrant repo
sudo dnf config-manager --add-repo https://rpm.releases.hashicorp.com/RHEL/hashicorp.repo
sudo dnf install -y vagrant
- Installed libvirt plugin (libvirt-devel and development tools were needed as well)
sudo dnf config-manager --set-enabled crb
sudo dnf groupinstall 'Development Tools'
sudo dnf install -y libvirt-devel
Followed by:
vagrant plugin install vagrant-libvirt
Vagrant file definition
I’ve used this box as a “template” for a VM:
https://portal.cloud.hashicorp.com/vagrant/discover/formationgpa/r9docker
It has Docker preinstalled - but mind it is a community sourced box, so handle with care ;).
New folder has been created for the project and Vagrantfile with following contents has been made:
Vagrant.configure("2") do |config|
  swarm = [
    {
      hostname: "node1",
      box: "formationgpa/r9docker",
      ip: "10.20.30.10"
    },
    {
      hostname: "node2",
      box: "formationgpa/r9docker",
      ip: "10.20.30.20"
    },
    {
      hostname: "node3",
      box: "formationgpa/r9docker",
      ip: "10.20.30.30"
    },
    {
      hostname: "node4",
      box: "formationgpa/r9docker",
      ip: "10.20.30.40"
    }
  ]

  swarm.each do |machine|
    config.vm.define machine[:hostname] do |node|
      node.vm.box = machine[:box]
      node.vm.hostname = machine[:hostname]
      node.vm.network "private_network",
        ip: machine[:ip]
      node.vm.synced_folder ".", "/vagrant", disabled: true
      node.vm.provider "libvirt" do |lv|
        lv.cpu_mode = "host-passthrough"
        lv.cpus = 2
        lv.memory = 2048
      end
    end
  end

end
Such file is nothing more than a simple script in Ruby - for sure there’s room for optimization. But as I don’t know this language I’ve just read about basics and built in data structures so I could create such basic config. The amount of nodes is not crazy so it should be fine - I could add new nodes by copy and pasting entries in the swarm list.
If you use other hypervisors modify entries in provider section (may require adding additional Vagrant plugin as well).
You can check the file is valid with:
vagrant validate
If everything is correct the machines can be deployed with:
vagrant up
To stop them use:
vagrant halt
To remove:
vagrant destroy
To check status:
vagrant global-status
Swarm in action
After the VMs are up and running all it takes is to log in via vagrant ssh <NODE_NAME> and start a swarm leader on one of them via:
docker swarm init --advertise-addr <IP>
On the remaining ones use the provided link to join.
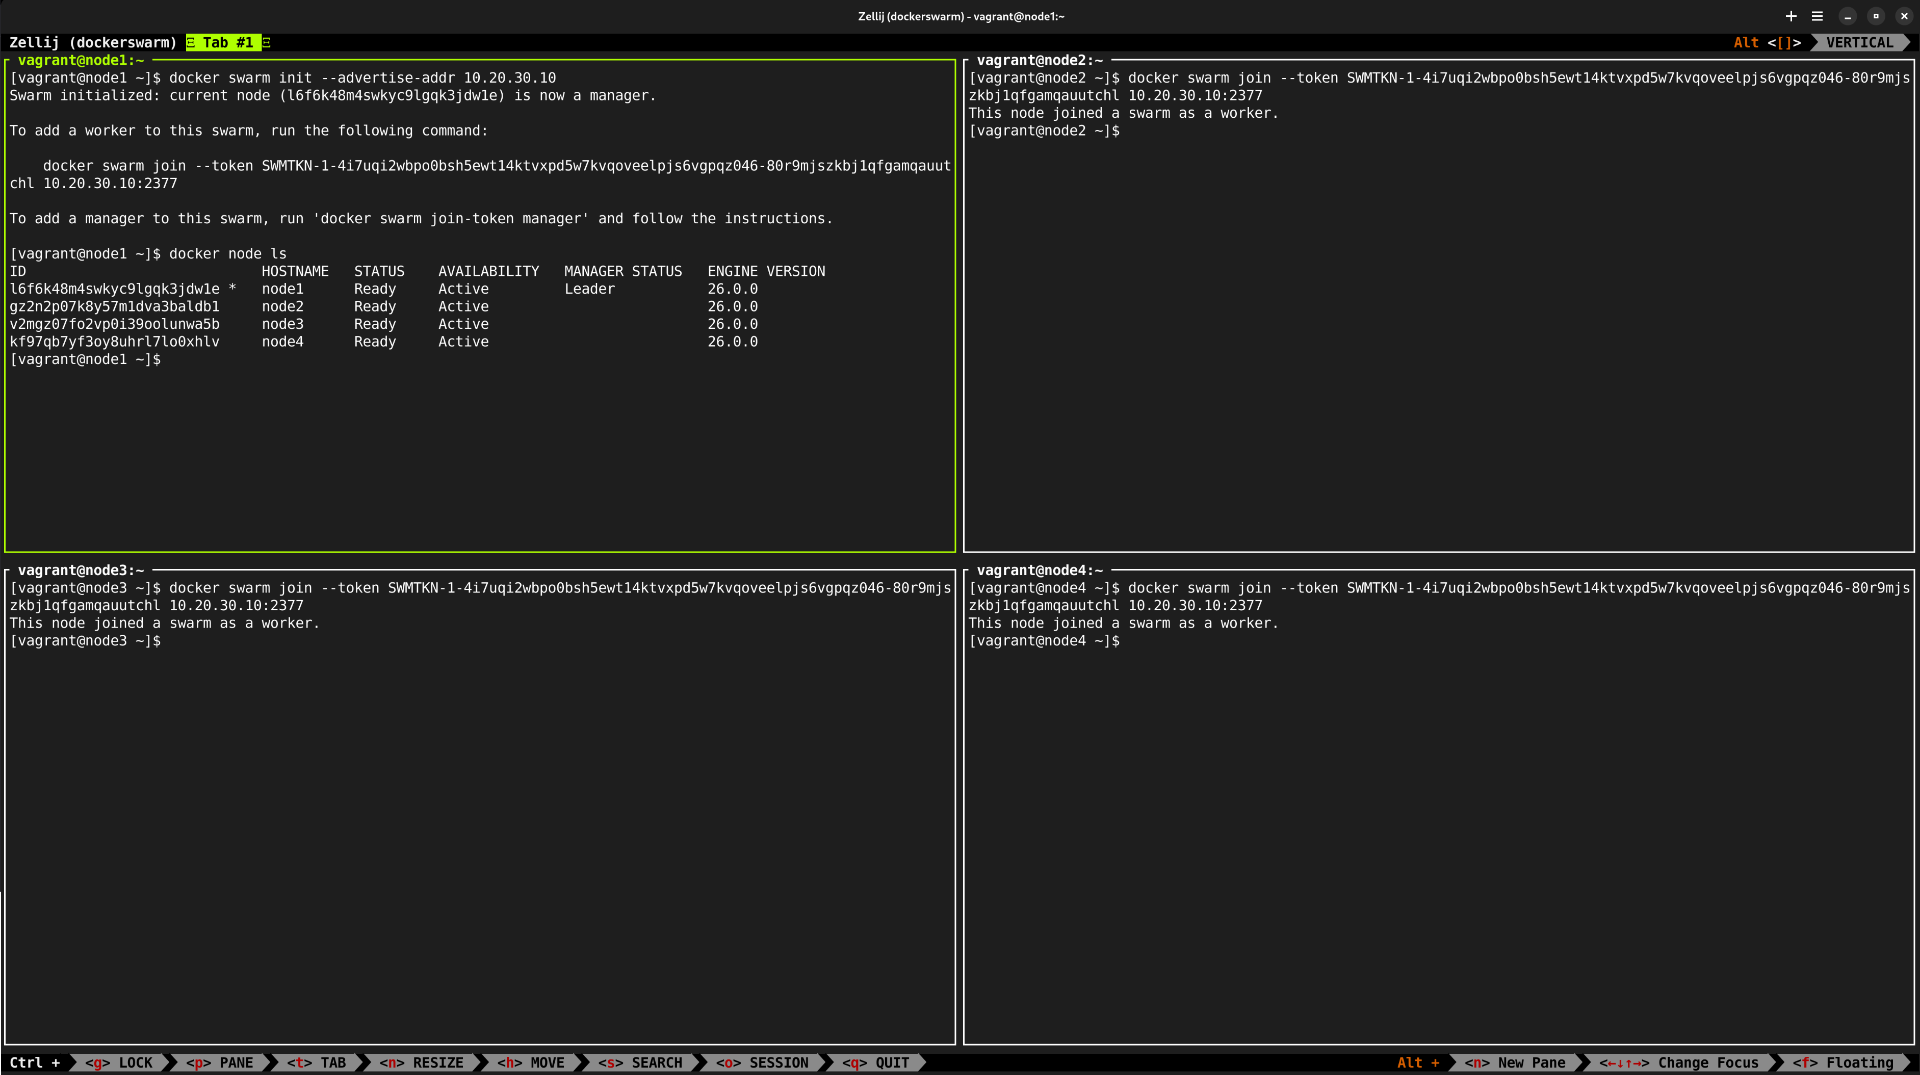
BTW - if you wonder about this split terminal screen I’ve used Zellij. Apart from dividing screen this multiplexer allows to save sessions and getting back to them later on - thus the workflow gets much smoother, you can get back where you left off. You can use other tool, like Tmux - but IMO Zellij is much more forgiving for a new user, required less setup. In Zellij all I had to to was to make copy work correctly:
https://zellij.dev/documentation/faq#copy--paste-isnt-working-how-can-i-fix-this
At this point the swarm is running - just start some service and have fun, for example:
docker service create alpine ping 8.8.8.8
Try shutting down one of the containers, check whether Docker brings it up again and so on (or remove the service with docker service rm <SERVICE_NAME> in the end).
For an awesome training on Docker and Swarm I highly recommend this Udemy course, this is the one that got me going:
https://www.udemy.com/course/docker-mastery
Refences
https://vagrant-libvirt.github.io/vagrant-libvirt/configuration.html
https://developer.hashicorp.com/vagrant/docs/networking/basic_usage
https://developer.hashicorp.com/vagrant/docs/
https://www.youtube.com/watch?v=a9pHnOkhcds
https://reintech.io/blog/working-with-data-structures-in-ruby